AWS Promotion: Claim back the cost of your Seahorse Licence in AWS Credits now >>

Migrating and Managing WordPress with Amazon Lightsail - Self-manage

Hosting WordPress on Amazon Lightsail is a cost-effective way to adopt the cloud and benefit from the security and scale of AWS.

Seahorse, a trusted AWS Partner, provides a simple seamless solution for migrating a WordPress site from an existing hosting provider (or localhost) to Amazon Lightsail. In addition, Seahorse provides a Management Console within WordPress to give users the ability to manage their Lightsail instance from their WP Dashboard.

In this tutorial, we’ll guide you through the process of how to launch a clone of your WordPress website on Amazon Lightsail in your own AWS account using the Seahorse software.

  • This process requires a paid license key – if you wish to run a trial clone to the Seahorse/AWS environment, please Click Here to navigate to the dedicated trial tutorial.

Skills and Specialized Knowledge

  • Users need basic WordPress administration skills to deploy and manage the plugin.
  • Additional knowledge of AWS and server management is beneficial but not required.
  • Users do not need an AWS account but must use a compatible operating system along with a supported DB format.

Learning Objectives

● Learn how to install and operate Seahorse’s software on a WordPress website
● Generate and install IAM keys to operate the Seahorse software from within a WordPress site.
● Understand the process involved in cloning a WordPress website to Amazon Lightsail

About this Tutorial
Time 20-30 minutes      
Cost Free to Trial
Use Case Compute
Products Amazon Lightsail
Level 100
Last Updated Feburary 2, 2024

WordPress Certified by Bitnami and Automattic/6.4.2-12-r16 on Debian 11

WordPress: v.6.4.2 | PHP: v.8.2.15
Apache: v.2.4.58 | MariaDB: v.11.2.2

Requirements
Web Server Apache, Nginx, Windows      
Min. PHP Version v7.0
Database MySQL or MariaDB
Min. WP Requirement v5.3
Enabled PHP Functions fopen(), cURL

Step 2: Sign in to the administration dashboard of your WordPress website

Complete the following steps to sign in to the administration dashboard of your WordPress website.

If you are already signed-in, skip to step: Install Plugin.

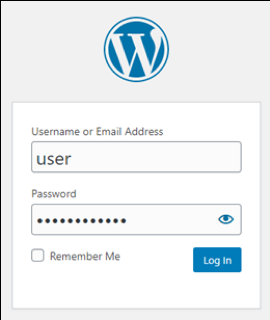
2.1 — In a browser, navigate to your site: http://example.com/wp-login.php

(replace example.com with the URL of your WordPress website). 


2.2 — Log into your instance.

  • In the Username or Email Address box, enter the relevant Administrator Username or Email.
  • Password box, enter the default Administrator Password.
  • Log In.

Step 3: Install the WP on AWS Plugin to your WordPress Site

Now you have logged-in to your WordPress Administration Dashboard, the required plugin can be installed.

3.1 — Download the Plugin zip file and upload it manually to your site. (Download WP on AWS Plugin here).

  • Navigate to Plugin tab on the admintrator sidebar menu
  • Select Add New
  • Select Upload Plugin
  • Select the downloaded zip file
  • Click Install Now
When the installation process is complete, click Activate to activate the plugin. 

3.2 —  Install via the WordPress Plugin Repository Search


  • Navigate to the Plugin tab on the admintrator sidebar menu
  • Select Add New
  • Type “wp migrate 2 aws” into the Search Plugins box
  • Scroll to the Correct Item
  • Click on Install Now

When the installation process is complete, click on Activate to activate the Plugin.

Step 4: Get a License Key From The Service Provider

A License Key is required to activate the installed Plugin.

4.1 — Contact Seahorse to acquire a licence key or if you do not wish to purchase a licence at this time you can opt to run a trial clone (to the Seahorse/AWS environment) – See Trial Tutorial

Step 5: Validate License

In this step, you will activate the License Key you received.

5.1 — Activate the License key you received from the service provider.
● Navigate to the WP on AWS Plugin interface
● Input the License Key received from the service provider and the corresponding email
address when requesting the license key
● Click on Register License
● Valid License key is then confirmed.

Step 6: Generate IAM keys

Once the License Key is activated, you can validate your AWS IAM keys.

In this step, you will create your own IAM keys for use within WordPress

● Login to your AWS account & navigate to the IAM service

● Click on Policies and add a new custom policy (please refer to the video guide). The content for this policy will be provided when you purchase any self-managed license. Simply paste this provided JSON into the policy creation generator.

● Click on Users => Add User, add a User name and check Programmatic access

● Click Next: Permissions and select ‘Attach existing policies directly’ => enter the new policy name you created in the above step into the filter and check the resulting selection.

● Click through to Create User and securely store the Keys provided (Access key ID & Secret access key)

Step 7: Validate IAM Credentials

Once the License Key is activated, you can validate your AWS keys.

7.1 — Validate your AWS Keys.
Complete the following steps to validate the AWS keys generated in Step 6:
● Go to the WP on AWS Plugin Interface
● Navigate to the AWS Setup section
● Input the IAM Key and the IAM Secret
● Click on Save IAM Credentials

Step 8: Set AWS Region and Select temporary Storage

In this step, you will choose the AWS Region and temporary storage bucket for your WordPress website.

8.1 — Set the AWS Region. This is the Amazon Lightsail Region where your WordPress site will be hosted.
In the WP on AWS Plugin interface complete the following steps:
● Navigate to the AWS Setup section
● Navigate to the Update AWS Region subsection
● Select your preferred AWS Region from the drop-down list
● Click on Update AWS Region

8.2 — Set the S3 Bucket. 
In the WP on AWS Plugin interface complete the following steps:
● Navigate to the Temporary Storage Configuration.
● Navigate to the Select S3 Bucket.
● Select your preferred S3 Bucket from the drop-down list
● Click on Select S3 Bucket

If you have not created an S3 bucket before you can create a new S3 Bucket by following below steps:

● Navigate to the Temporary Storage Configuration.
● Navigate to the Create S3 Bucket.
● Enter your S3 Bucket Name
● Click on ‘Create new S3 Bucket’ and refresh on left to Select

Step 9: Prepare the Website's Database

In this step, you prepare the Database. 

9.1 — Create an automated clone of your website’s database.
In the WP on AWS Plugin interface, complete the following steps:
● Navigate to the Prepare Database Status section
● Click on Prepare Database
● The prepared download will then be confirmed and the database status updates

Step 10: Prepare the Website's File System

In this step, you prepare the website’s file system. 

10.1 — Create an automated clone of your website’s file system. This includes your themes,
plugins, images, etc, and will be used to display your website’s content on AWS.
In the WP on AWS Plugin interface complete the following steps:
● Navigate to the File-System Preparation Status section
● Click on Prepare File System
● The progress is indicated by the Progress bar. Progress duration varies depending on
the size of your file and the server on which it is hosted.
When completed, the file system preparation status will be updated.

Step 11: Clone the Prepared File System

Now that your website has been prepared, a copy can be uploaded to AWS.

11.1 — Upload the clone of your website
This includes your database, themes, plugins and images etc and will be used to create your cloned website on AWS.
In the WP on AWS Plugin interface, complete the following steps:
● Navigate to the Clone to AWS Status section
● Click on Clone to AWS
● When complete, the Clone to AWS status will be updated. Progress duration may vary depending on the size of your file system and the server on which it is hosted.

Step 12: Launch your website on Lightsail

After a copy of your Website has been cloned to AWS, it can now be launched.

12.1 — Run a Migration to view a clone of your WordPress website in Amazon Lightsail. In the WP on AWS Plugin interface, complete the following steps:
  • Navigate to the Launch a Clone of This Website on AWS section
  • Add name of your instance
  • Select the region for instance for launch
  • Click on Launch AWS
  • When complete, the IP address of your cloned website will become available.
12.2 — You will receive an email to the address associated with your license which contains links to view your cloned site.
  • Click on Download Key to retrieve your SSH Access key.

Step 13: Create static IP and assign to your instance

In this step you will learn how to create a static IP & assign it to your instance.

14.1 In the Networking tab, click Create Static IP

14.2 Instances in your chosen region not currently assigned to a Static IP will be presented. Selected your instance.

14.3 Set a specific identifier name for your static IP

Step 14: Create CPU Utilization alarm

In this step we will create a CPU Utilization alarm to monitor your new instance

16.1 Select the metrics tab of your instance

16.2 Choose the CPU Utilization metric and Add Alarm. 

*Our recommendation is greater than or equal to 60% for 2 times in the last 20 minutes. We also advise adding a notification method (email or SMS)

Step 15: DNS update and install of SSL Certificate

The final step is point your domain at the Static IP you created and to install and configure an SSL cert for your domain so the site can run over HTTPS.

17.1 Point your domain at your newly created Static IP

17.2 Once your DNS change has propagated run the following command via your chosen SSH client

sudo /opt/bitnami/bncert-tool

* The bncert tool is self explanatory and will configure a cron to auto renew your cert so the process only has to be run once

17.3 Than It will ask for the domain list you want to install SSL certificate and complete the process.

Step 16: Management Overview Console (Subscribers Only)

Finally here is an overview of the Management Console that is available within your WordPress website on AWS.

Note: The management console is available for only users with subscription license. 

18.1 — Once your Website has been launched on AWS Lightsail, a Management Console is available by clicking the WP Manage AWS tab on the Plugin Menu (on the cloned site)


From this Console, key information about your AWS server is available.
Actions can also be carried-out on your AWS Server from within the Management Console, such as:
● Reboot
● Change Tier
● Change Region
● Create Snapshot
● Boot from Snapshot
● Add Alarms

Congratulations

You migrated your WordPress website to run on Amazon Lightsail using Seahorse!

Cart (0)

  • Your cart is empty.